Our MOPS~Mothers of Preschoolers~ group meets every Tuesday during the school year. We have a "Creative Activity" or craft every other week for the most part. We average 80-100 women which makes the task slightly difficult of finding & creating a craft for that many people to complete within 15 minutes, at lots of different levels of crafting ability, tons of different tastes, and did I mention on a super tight budget? What one person, 10 people and 100 can create differ greatly.
But, to say all of that, I am excited to share what we did as our first real creative activity.
I am giving all the steps in case 1.) You wanted to make more yourselves. Super easy and inexpensive gift for teachers, coworkers, etc. 2.) Other MOPS Creative Activities ladies might want an idea for their group.
So, first, the final product:
And, now, how we got there.
Supplies:
Clothespins
Neodymium Magnets {SUPER Powerful!}
Large Burner Covers
Can Black Matte Spray Paint
Quart Black Chalkboard Paint
Crop-a-Dile to poke the holes and a metal file to file holes
Wide Ribbon
glue
Chalk to season/prime.
 |
| 200 Clothespins |
I decided to glue the magnets on because they were so tiny I feared they would get lost. And they were so strong, if the board was slightly touched, they all snapped together like a mousetrap or domino affect, which Jesse found quite funny!
 |
| 100 ribbon loops to hang the chalkboards with! |
I used 3 kinds, honestly, because I bought the first 2 striped ribbons from Stampin' Up to coordinate with the Designer Series Paper and under estimated the amount I needed.
I pre-cut, knotted, & sealed the loops with glue. I knew it would take a lot more ribbon if they tied the knot themselves {budget}. And frustration isn't fun for those that don't like to tie ribbons. Also, time is always a constraint.
I cut the paper to be glued onto the clothespins from a retired pack of Designer Series Paper. It is double sided so there is a choice of designs but they all coordinate along with matching the ribbons.
3/4" X 2 3/4" strips times 200+.
I packed them in groups of 8 kits for each table to make sure everyone had enough supplies and they are easy to find. I emptied them into our little black buckets for ease of delivery to each table the morning of MOPS.
I only have 1 Crop-a-Dile, so this is another step in the prep process that had to be done at home. Since the ribbon I chose was wide, it took 3 holes. Then it left sharp edges, so I filed them with a metal file.
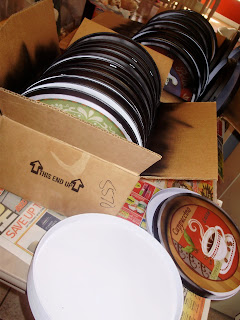
I lined them up in a box and spray painted the sides matte {to match the matte-ness of the chalkboard finish}. Just turned them 3-4 times to hit all the side.
Ready to roll the chalkboard paint on!
1 coat.
Painting complete. Now all stacked and ready to take to MOPS.
The coordinating factor is my fave part of this project. Oh, and the usefulness. :)
I hope the ladies at MOPS @ the Mall enjoy them!
Note: If you desire to know the location these supplies were purchased or you are a MOPS C.A. person and want to know Cost-Per-Person, please message me. Happy to help!


